Recently I’ve been doing a lot of small projects that involve RADIUS authentication on devices and have had to build multiple RADIUS auth servers for testing communication and integrating with 3rd party systems.
A very cool thing about being able to spin up a simple RADIUS server is you can create a basic server then hook it to your favorite authentication service and/or threat detection service. So, for example, let’s say you want to authenticate a user against a local repository or LDAP directory, then verify that the user is valid in your enterprise threat detection system, you can do that by simply adding in another validation step.
It also gives you the option to point servers at your custom application and send login requests to it and verify what your clients are sending, etc. This is great for debugging hardware that may not have the best internal logging. The options are really endless.
What I’ve done is created a simple node class RadiusServer. This handles the basic processing and can be expanded out to cover whatever you might need.
The two required packages are radius and dgram.
Here is my simple package.json.
{
  "name": "SimpleRadiusServer",
  "version": "1.0.0",
  "description": "SimpleRadiusServer",
  "main": "server.js",
    "author": {
        "name": "josh santomieri",
        "email": "----@----.---"
    },
    "dependencies": {
        "dgram": "^1.0.1",
        "radius": "^1.1.3"
    }
}
And here is the basic code for the server. If you spin this up you can fire radius requests at it using a device, or testing application.
var radius = require('radius');
var dgram = require("dgram");

function RadiusServer(settings) {
    this.config = settings || {};
    this.port = this.config.port || 1645;
    this.secret = this.config.secret || "";
    this.server = null;

    this.ACCESS_REQUEST = 'Access-Request';
    this.ACCESS_DENIED = 'Access-Reject';
    this.ACCESS_ACCEPT = 'Access-Accept';
};
RadiusServer.prototype.start = function () {
    var self = this;

    // create the UDP server
    self.server = dgram.createSocket("udp4");

    self.server.on('message', function (msg, rinfo) {
        if (msg && rinfo) {

            // decode the radius packet
            var packet;
            try {
                packet = radius.decode({ packet: msg, secret: self.secret });
            }
            catch (err) {
                console.log('Unable to decode packet.');
                return;
            }

            // if we have an access request, then
            if (packet && packet.code == self.ACCESS_REQUEST) {

                // get user/password from attributes
                var username = packet.attributes['User-Name'];
                var password = packet.attributes['User-Password'];

                // verify credentials, make calls to 3rd party services, then set RADIUS response
                var responseCode = self.ACCESS_DENIED;
                if (username == "test" && password == "test") {
                    responseCode = self.ACCESS_ACCEPT;
                }

                console.log('Access-Request for "' + username + '" (' + responseCode + ').');

                // build the radius response
                var response = radius.encode_response({
                    packet: packet,
                    code: responseCode,
                    secret: self.secret
                });

                // send the radius response
                self.server.send(response, 0, response.length, rinfo.port, rinfo.address, function (err, bytes) {
                    if (err) {
                        console.log('Error sending response to ', rinfo);
                        console.log(err);
                    }
                });
            }
        }
    });

    self.server.on('listening', function () {
        var address = self.server.address();
        console.log('Radius server listening on port ' + address.port);
    });

    self.server.bind(self.port);
};

var rServer = new RadiusServer({ port: 1645, secret: "MySecret" });
rServer.start();
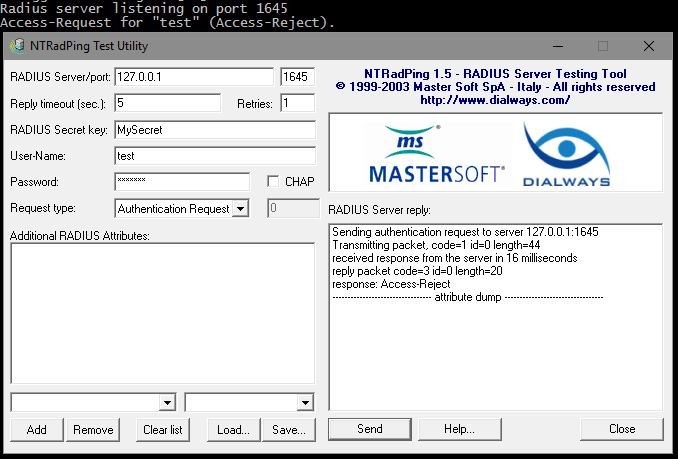
If you use the username and password test with the secret MySecret then you should get an Access-Accept response, any other user/password/secret will result in an Access-Reject response.
And with the password changed, you get an Access-Reject.
If you take a look in the code, you can add in any of your authentication methods, web service calls, anything you can think of that you need to validate logins. Or, add in logging, reporting, proxying, etc.
// verify credentials, make calls to 3rd party services, then set RADIUS response
var responseCode = self.ACCESS_DENIED;
if (username == "test" && password == "test") {
    responseCode = self.ACCESS_ACCEPT;
}
While this is a very simple implementation that doesn’t specifically do anything powerful, it’s a base to much more powerful options. Hopefully it will help point you in the right direction if you’re looking to accomplish something similar. You can also easily load this code up in your favorite docker container for simple hosting and deployment options.
Have a question, feel free to ask!

