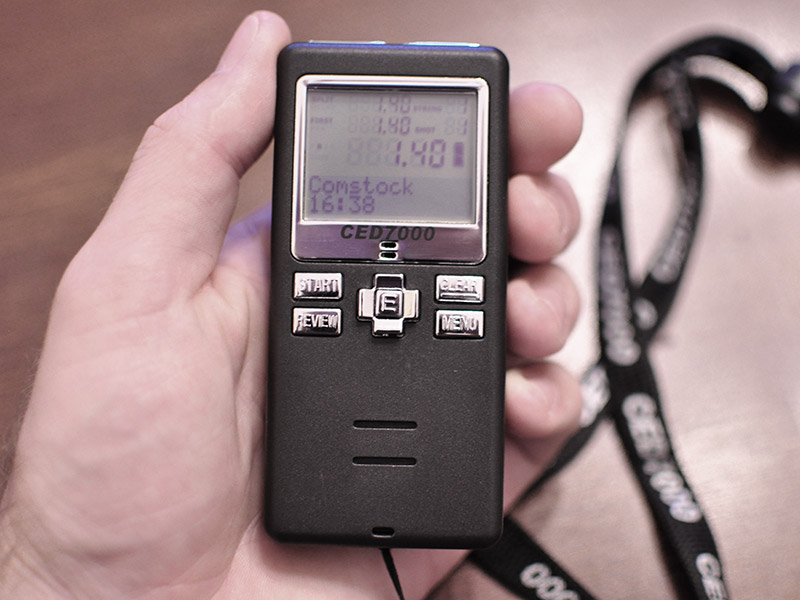
CED7000 Shot Timer

The CED7000 is one of the few shot timers on the market (there isn’t a lot of options out there). But it works quite well, and has a lot of options available, including the ability to add external buzzers and various time displays for competitions, etc.

If you’ve watched any of the Jerry Miculek videos on YouTube, from what I can tell, he uses the CED7000 timer. So unless you are doing some real crazy stuff, it should do everything and more than you could want.

I was turned on to this timer from a training class I attended with SWORD International. After getting a chance to use the timer in a real world training situation, as soon as I got home, I went online and ordered one from Midway USA!

The main thing I really like about using a shot timer is that it adds a sense of urgency, and heightened sense of awareness while training. It’s almost hard to describe, but when you hear that buzzer, it gets your heart pumping! Also, it gives a really good way to measure improvements and can help you balance that blend of speed and accuracy, down to the hundredth of a second.

For the actual use of the timer, it’s much nicer to have another person be able to start the timer for you, so it’s not in the way, and it’s a little more of a surprise. But, it comes with a wrist and neck lanyard, they also make belt clips for it, something that I may pick up soon. But for now, the neck lanyard seems to work ok for training on your own. There are multiple modes on the device, the mode that i mainly use is the standard IPSC “Comstock” mode with the buzzer set to “Random”. For training on your own, the random mode is the best. It basically boils down to when you hit start, it will randomly buzz anywhere between 2 and 5 seconds. This helps keep you from jumping the start and helps with that adrenaline burst you get.

There are also various other modes of operation, including Par times, silent mode, timer mode, … if you are interested in checking out all of the features, check out the owners manual.

An interesting point I found when going through the manual was that the timer will remember a string of up to 39 shots. So what that means is for any given set of shots (up to 6 sets) will contain 38 shots with splits, then any number over that will be the 39th shot. So if you fire 50 shots, 1-38 will be the first 38 shots, but the 39th shot on the timer will be your 50th shot. I’m not sure when you would want to time something that was more than 39 shots, but just so you know, if you need splits on all of the shots, you’ll need a different device. But I think for standard applications, this should work just fine.

To wrap it all up, if you are not using a shot timer during your training, you should be. The CED7000 is a great timer that has more functions than most will ever use and is the perfect addition to any training regimen. Go pick one up or find someone that has one and ask if you can try it out!

Here is a quick snap of me using the timer doing some shooting and reloading drills.

Haley Strategic D3 Chest Rig

I recently purchased the Haley Strategic Disruptive Environments (D3) chest rig in the Kryptek Highlander camouflage pattern.

My first impressions of the rig is that it’s nice and well made, and for the most part, does and holds all of the things that they mention on the site.

Here are the basic specs off of the Haley Strategic site, http://l.santsys.com/155sDR7.

  • 4 fully loaded magazines (M4, M16, AK) with Hypalon® magazine retention tabs
  • 2 Multi-Mission Pouches with Hypalon® magazine retention tabs
  • 2 flapped GP pouches
  • 1 STUFFIT™ pouch
  • 500D Construction

I put 4 AR-15 mags, 2 Glock 17 magazines and a flashlight into the rig without any issues and there was room to spare, as I would have imagined there would be. I tried stuffing some other magazines in there, and the only mags that didn’t really fit well were shorter stubby mags like my Glock 36 mags. They are too short and a just didn’t fit well. But with 1911 mags, and the Glock 17 and 23 mags I tried, they worked perfectly.

One of the things that was pointed out in some other reviews that I saw was that there are a lot of dangling straps once you have the rig on and pulled tight, and there definitely are. Depending on your frame, you end up with anywhere from an inch or two to 6-8 inches of extra strap on each side. This isn’t really a bad thing, but it will get annoying. You can use some rubber bands or some velcro strips to wrap up the excess if you need to, I know I will be doing that.

The shoulder harness that comes with the rig is pretty basic, it doesn’t have a lot of webbing on it (3 webs on each strap), but I wouldn’t suggest attaching too much to the straps, they are pretty floppy. Also, there is no padding or anything like that in the straps, so with a full loadout, the straps may not be the most comfortable things. To me, it looks like the straps seem like you can use them if you want to, but it is really designed to hook into a plate carrier. So that’s great if you have a plate carrier, but if you don’t, you may end up not liking the shoulder harness if you have to use this rig regularly with a heavy loadout.

Other than the harness being a little less than expected, I think this is a great rig, and you can really mix and match it with a lot of different gear. Also, the 500D construction should hold up pretty well. I’m hoping to take it out and run it through it’s paces doing some shooting and see how it holds up when it’s getting banged around.


SWORD International – Introduction to Pistol

I recently had the opportunity to take part in a S.W.O.R.D. International, Introduction to Pistol class. I wasn’t sure what exactly to expect, I’ve taken CCW training classes and some various other trainings, but nothing at the level of this. Going into it with an open mind and just wanting to learn as much as i could from some experienced shooters, I must say, I was pleasantly surprised in every aspect. The trainers, Garett and Jeremy, were awesome! Hands down, awesome! There were no agendas or anything like that, and everyone in the class were just a bunch of people wanting to learn some new skills and have some fun in the process.

Here is how the day progressed….

We showed up to the SWORD office in the morning around 9am, then proceed to fill out some paperwork and get everyone in the class introduced to each other and to chat about everyones basic skill level and general knowledge. Since this was a Introduction to Pistol class, most of the people were novices. Though, there were a couple of us who had been shooting longer than others, but just had not taken a class offered by SWORD.

After a bit of chatting back at the office, going over some of the details, we headed out to the range. Here we did in-depth safety briefings, and basic “range rules” to keep everyone safe and to cover what to do in case of an emergency.

After the safety briefing, we jumped right in, going through all of the basics. How to properly make sure your firearm is unloaded, how to properly grip and present the firearm, how to properly take aim, how to properly squeeze the trigger… As an avid shooter for the better part of 15 years, a lot of the things that were covered were things i have heard many times, but the way they were presented and demonstrated shed a new light on the fundamentals. Showing that shooting is an ever evolving thing, and that you definitely can teach an old dog new tricks.

Once we had all of the basics down, and the trainers checked out everything we were doing to make sure we were doing right, we got setup for live fire. The chance to apply the things that we all had been practicing! After we all applied the fundamentals and shot a 5-shot group, I was amazed at how the little tips and critiques, in just a few minutes, improved my group sizes.

As Garett told us, it’s about training smarter and learning from each shot. Every shot you take, you should see what you did wrong, or right. You have to be aware of what you are doing and make every shot count!

After getting the basics down, and everyone in the class improving group sizes, in what i would consider record time, we layered on things like drawing from a holster and proper draw stroke, and then incorporating drawing and firing.

We did a fairly large amount of drawing and firing practice (layering on all of the fundamentals), after that, we moved into things like proper reloading practices and immediate action drills. Immediate action drills are drills you can use when you are shooting and your gun doesn’t fire, for example if the slide doesn’t lock back when out of ammunition, or there is a failure to eject, etc.

Over the entire training, I fired a little over 200 rounds, not a lot, but in those 200 rounds I think that I learned more than in the previous 5000 rounds before it.

In short, if you haven’t taken a class before, you need to. I don’t care if you’ve been shooting for 1 day or 20 years, you will learn something and have a great time in the process.

Here is what I brought to the class:

  • Glock 17 (9mm, Factory with no modifications)
  • 2 Magazines
  • Blade-Tech Holster and Mag carrier – http://l.santsys.com/1bzBez4
  • CamelBak (it was hot out there)

So you don’t need any crazy expensive gear or anything like that to take one of these classes. The basics, an open mind, and a willingness to learn are all you need!

Check out the S.W.O.R.D. International website, http://l.santsys.com/15q3LkA and get yourself, and your friends signed up for a training!

AR-15 Build – Follow Up

I finally got my California bullet button and my Optics mounted and was able to hit the range with my new rifle.

Just for follow up, the rifle is a Coronado Arms lower, PSA lower parts kit, Bravo Company upper and bolt carrier group and a Vortex SPARC Red Dot.

Everything functioned flawlessly, there were no failures of any type and everything was accurate and held together amazingly.

I was able to get everything sighted in without issue, and in less than 10 rounds.

Over time I plan to get a lot more range time with the rifle, but from initial first impressions, and minimal use, it’s an amazing build, and I plan to build out a few more in similar fashion.

Check out the video review and some action shots below! And don’t forget to subscribe to the YouTube channel!

Benchmade Griptilian Knife

Hey Everyone. I recently was given a new Benchmade Knife for my birthday. As a guy who is usually firmly in the camp of, “I wouldn’t pay that much for a knife”, my opinion has immediately been changed!

I’ve used many cheaper Buck knifes or other various “Big-5 sale” knifes, with good success. But, once you pick up and use one of these Benchmade knives, be prepared for your opinion of the more budget friendly knife to be changed for the worse.

Benchmade started out in California in 1988 and is now located in Oregon, where they have been since 1990. They pride themselves on making high quality knives using “non-traditional materials and modern manufacturing methods in not only building knives better but, inevitably building better knives.”

In line with their statement, I have to say, I’m really impressed with the build quality and general functionality of the knife. It has a nice weight to it, so it feels great in the hand and it’s very well made. Everything works super smoothly and opens with one hand without any issues.

This particular knife uses their patented Axis locking design. I’ve never used a knife with a design like it, but I really like it. It provides a firm lock, but is easy to disengage, and is ambidextrous. Here is the companies blurb on the Axis system.

“AXIS® A patented Benchmade exclusive, AXIS® has been turning heads and winning fans ever since its introduction. A 100-percent ambidextrous design, AXIS® gets its function from a small, hardened steel bar which rides forward and back in a slot machined into both steel liners. The bar extends to both sides of the knife, spans the liners, and is positioned over the rear of the blade. It engages a ramped, tang portion of the knife blade when it is opened. Two omega style springs, one on each liner, give the locking bar its inertia to engage the knife tang. As a result, the tang is wedged solidly between a sizable stop pin and the AXIS® bar itself. Available in manual, assist or automatic configurations.”

Overall, this is a really great knife. I would highly recommend checking one out, and if you are in the “I wouldn’t pay that much for a knife” camp, I urge you to go to a store that sells these and give one a try. If you already want one, you can order them from Amazon, http://l.santsys.com/12WGwyu.

To check out more information on Benchmade, check out their website, http://www.benchmade.com/. Also, watch a video review of the knife below!

AR-15 Completed Build

I finally got most of the parts for my AR-15 build up and got everything put together.

Here is a parts breakdown:

The first thing I want to really point out is the fit of the upper and lower. I have a Smith and Wesson MP15T AR-15 and when you grab the pistol grip, there is noticeable wobble between the upper and lower. They are just not “precision” fit. With the Coronado Arms lower and BCM upper, there is absolutely no wobble. Everything is an exact fit. I try to outline some of that in the review video at the bottom of this post.

This was my first from the ground up build, and I was surprised how easily everything went together. I’m really looking forward to getting this rifle out to the range and seeing how it shoots!

I’m waiting on getting a CA legal bullet button and then I will get to the range and a range report and video will follow. Please subscribe to my youtube channel to get updates on when I get everything put up. http://l.santsys.com/12QMPDE

Vortex Sparc Red Dot

I recently decided to get a Red Dot for my AR-15 build out, I opted to go with the Vortex Sparc Red Dot. I mostly decided to go with it after the review by Mac on the Military Arms Chanel. He does a good review and some durability tests. Check it out.

Some things to note, I’ve found that with red dots and holographic sights, the way my eye is, causes the dot to be a little misshapen and not clear. This is my eye, and not the optic. In the video below I discuss some of the details around that and show some pictures and video of the reticle. Check it out!

You can pick one of these optics up on Amazon for $199, http://l.santsys.com/14MwsXs

Coronado Arms Lower Build

I finally got my lower parts kit for my Coronado Arms lower build out. I used a lower parts kit from PSA. The parts kit was a basic kit with a Magpul MOE stock and grip in Flat Dark Earth.

Everything went together well and looks great! Check out the video below for all of the details!